Are you familiar with Facebook messenger chatbots?
These amazing little tools let you have conversions with your Facebook fans without you even having to be present. This means that even if you’re on vacation, sleeping, or doing other work, you can continue to connect with your fans in a personal and meaningful way.
Pretty cool, huh?
This post is going to walk you through exactly how to create a free Facebook Messenger chatbots without ANY coding. This means ANYONE can create one, literally within minutes.
Let me introduce you to my newest program, The Facebook Messenger Bot Academy. The complete A-Z system that will simplify the process of creating your bot marketing strategy and turning it into a list-building, revenue-generating machine.
But first, let’s briefly take a look at WHAT chatbots are, as well as some real-life examples of companies that are using them.
What in the World are Chatbots?
Chatbots are essentially software programs that mimic human conversations. Relying either on artificial intelligence or on a set of predetermined rules, they create a kind of back and forth chat experience with your customers or fans.
Chatbots can allow you to accomplish a variety of things, including:
- Directing users to your website
- Letting customers automatically set up an appointment with you
- Answering commonly-asked questions
- Buying products from your e-commerce site
Still not wrapping your brain around what a chatbot actually looks like? Let’s take a look at a couple of real-life examples of businesses who are using them.
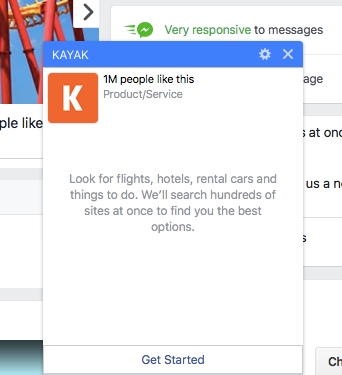
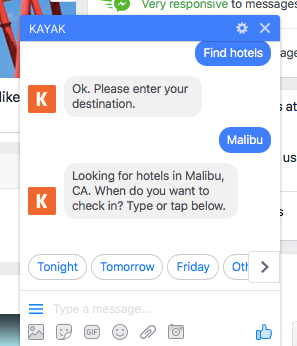
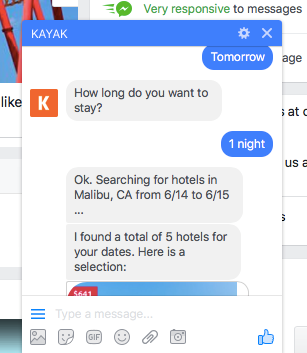
Kayak: Book flights or hotels via Facebook Messenger
Kayak is just one travel company that uses Facebook Messenger chatbots to make the booking experience SUPER easy for customers. As you can see from the screenshots below, it doesn’t get much easier!
At each step of the process, you can either type in what you’re looking for, or choose from some pre-selected options. This chatbot will take you all the way from researching potential booking options to actually booking a flight or hotel via Facebook Messenger.
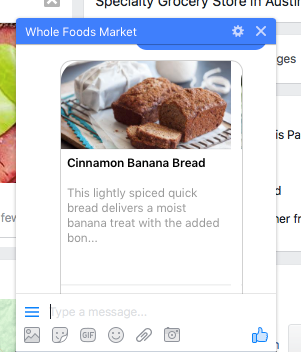
Whole Foods: Find a store or look for healthy recipes
Whole Foods chatbot takes a bit of a different approach. Their bot lets you find a local store, or search or browse for recipes. In that way, it takes a bit of a less “salesy” approach.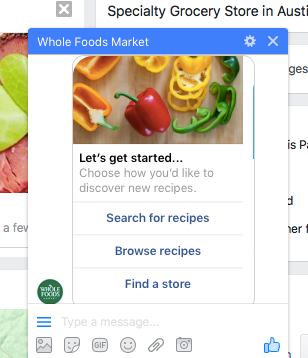

Interested in trying out a chatbot yourself? CNN’s chatbot is a great place to get your feet wet!
How to Create a Facebook Messenger Chatbot
I hope that the examples above have whet your appetite for creating a chatbot for your own business.
While it may seem like a highly-technical endeavor, it’s actually possible to create a chatbot without any technical skills…for FREE!
There are two main ways to do this: using Facebook’s response feature, or using a tool like ManyChat. The rest of this post will guide you step-by-step through both of these options so you can set up your own chatbot on Facebook today!
3 Steps to Setting up Facebook’s Response Feature
Facebook’s response feature is a great tool for quickly creating a very basic chatbot on your Facebook page. While your bot won’t be nearly as elaborate as the ones above, it will provide a great resource for your fans, and will help set users’ expectations of your page.
1. Find your “Response Assistant” on your Facebook page
From your Facebook page, go to Settings à Messaging.
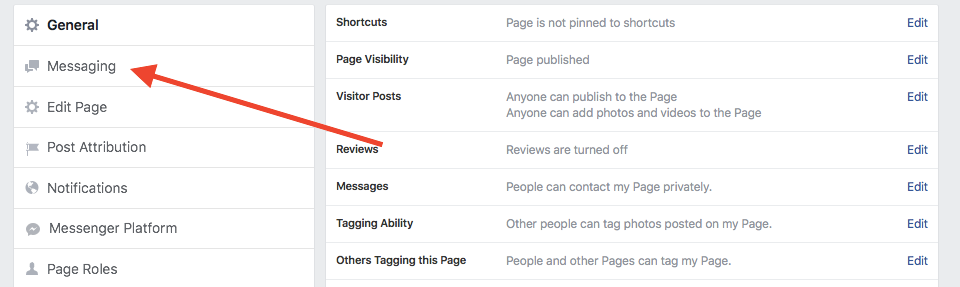
From here, scroll down to the section titled Response Assistant (underneath General Settings).
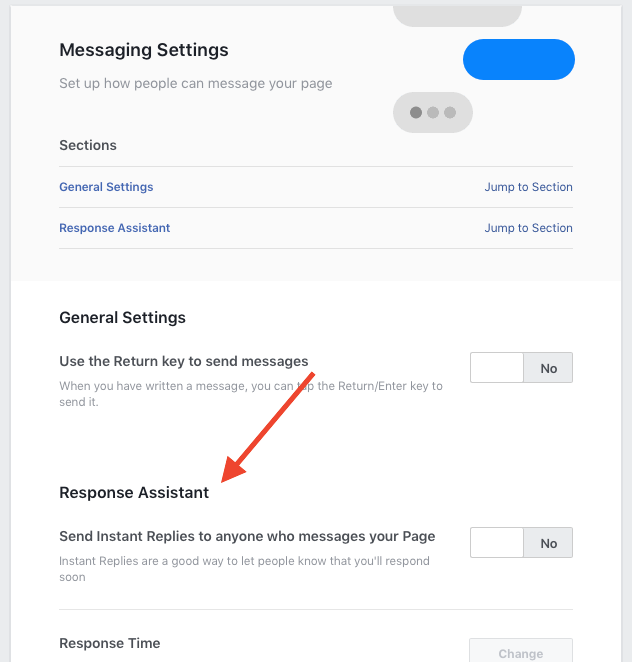
In this section, you’ll have a number of options you can customize, however only two of these options are relevant to your Facebook bot: Send Instant Replies to anyone who messages your Page and Show a Messenger Greeting.
2. Set up your Messenger greeting
This is what people will see right after they click on the Message button. This is a message that should make them feel welcome and should encourage them to leave a comment or ask a question.
The main thing you’ll need to do here is simply turn this feature on by turning the slider to Yes.
By default, the standard greeting is “Hi [first name]! Thanks for getting in touch with us on Messenger. Please send us any questions you may have.”
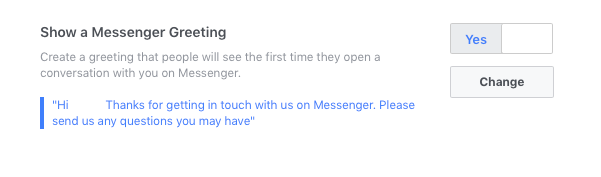
This isn’t a terrible greeting, but I’d recommend changing it something a little more personal and specific to your brand.
3. Set up your instant replies
Next, you’ll want to go to Send Instant Replies to anyone who messages your Page and turn the slider to Yes.
This allows you to specify a message you’d like users to receive after sending you a private message through your page. Within a few seconds of messaging your page, they’ll receive this message…and Facebook even shows three little dots so it looks like you’re actually chatting in real time.
The default message is this: “Thanks for messaging us. We try to be as responsive as possible. We’ll get back to you soon.”
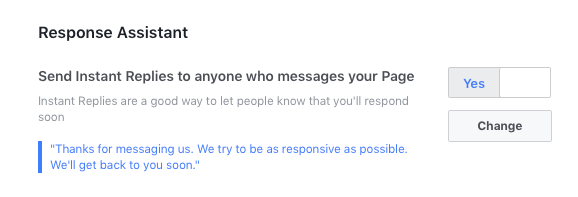
I’d strongly recommend changing this message to something a little less boilerplate!
Besides changing the default text, you can also make some changes by clicking on the Add Personalization link. These changes include:
- Person’s first name
- Person’s last name
- Person’s full name
- Your website URL
And that’s it! This very simple process lets you briefly connect with your fans, even when you’re not able to be online.
Looking for something a bit more customizable and advanced, but still FREE and super easy to set up? Next, let’s look at setting up your own Facebook Messenger chatbot using ManyChat.
4 steps to setting up a chatbot using ManyChat
Don’t worry…This is almost as easy as setting up Instant Replies on Facebook, and it offers tons more features and customization.
1. Connect your Facebook page in ManyChat
Go to the ManyChat homepage and click on the big Get Started button. This will walk you through the simple process of allowing ManyChat access to your Facebook profile and pages you manage. Don’t worry – it won’t post anything to Facebook without your consent!
Simply click Allow and then select the page you want to want to add your bot to.
2. Go Through the ManyChat tutorial
Once ManyChat has access to your page, the system will walk you through a brief tutorial about bots, starting with something that looks like this:

On the second screen, it will give you the option of Sending to Messenger…click it! This will send a sample welcome message to your inbox so you can see exactly what it will look like to anyone who messages you (don’t worry…nothing is set up yet on your page).
This process ends with a screen that looks like this:
3. Set up your first broadcast
Next, you’ll see a screen that looks like this:
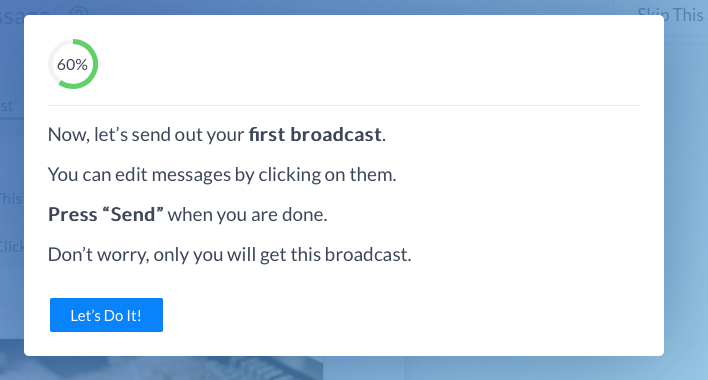
Click the button to start setting up your bot. The first “broadcast” is actually the first message people will receive after sending you a message through your page. This message should thank people for contacting you, and ask them to take further action.
You have the option here of including several buttons with specific calls to action (CTA’s). Here are some of the ways you can use these buttons:
- Send people to your website
- Send people to a dedicated landing page (e.g., for a specific product or piece of content)
- Reply with another message
- Call a phone number
Depending on what you want to happen, change the title of your button as well as the action that takes place under Do this when user presses the button.
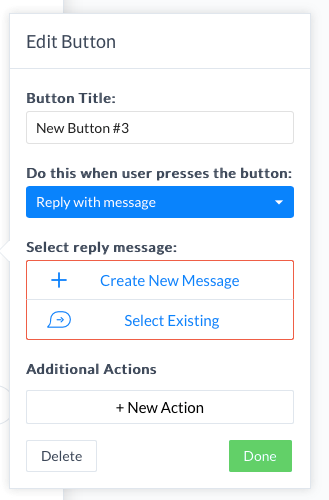
Example: Let’s say I want to direct people to my website. My button title might be Go to website, and under “Do this when user presses the button”, I’d select Open website. You can input any URL you want here.
Example: Let’s say I want to guide people through some more detailed messages. For instance, if I have an e-commerce site, I might want people to be able to select from a few options regarding their order. In that case, my questions might look like this:
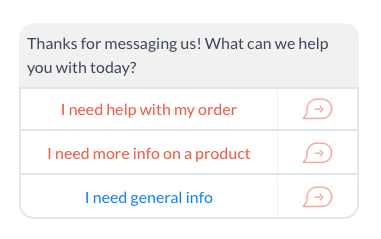
Instead of selecting Open website, I would choose Reply With Message to continue the conversation so I can pinpoint exactly what they need.
*Keep in mind button titles must be 20 characters or less, or your text will be in red font (like mine is above!).
This process will likely take a while to set up. I’d encourage you to think about how you can guide people into your funnel (i.e., get their email!) while also providing the info or help they need.
Once you have everything the way you want it, click through to the final step!
4. Get to know your ManyChat dashboard
Anytime you go to ManyChat, you’ll now automatically be directed to your ManyChat dashboard. From here, you’ll be able to edit your messages and settings, as well as receive information about your subscribers.
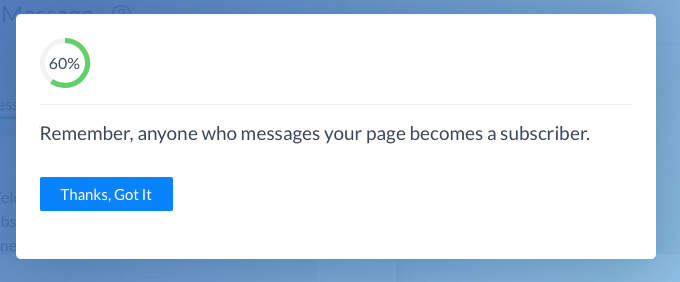
One of the AMAZING things about using a ManyChat bot is that anyone who messages you has the option of becoming a subscriber. This means you can continue to broadcast messages to these users anytime you want!
You’ll also be able to see the names of your subscribers, and to find out exactly when and how they opted in. This is great information to have so you can replicate funnels that are working well for you!
Final thoughts
I hope this post has given you the motivation and confidence to set up your own chatbot. If you’re short on time, start with a simple Facebook response. Then, once you’re ready to take things up a notch, you can always set up your ManyChat bot with just a little more work and creativity.
I’d love to know: Are you planning to set up your own chatbot? What platform are you going to use? Let us know below!
3 thoughts on “How To Create Your First Facebook Messenger Chatbot For FREE With NO Coding”
This is so awesome! Manychat is so good
Your blog writing skill is so impressive and i like to read this topic discussion.
Interesting ideas