Have you ever wondered how to start a blog for fun or profit?
With all the amazing blogging tools and platforms out there now, it’s never been easier to get started.
You can literally go from an idea to a fully-functioning blog in 30 minutes or less. And the best part? You don’t need any technical skills or knowledge – just the ability to follow a set of simple instructions. I wish I had a simple, step-by-step process like this when I started my blog oh so many years ago. I created my first blog in 2005 and I spent HOURS figuring it all out! This guide shares what I learned along the way so that you don't have to spend hours, hunting and pecking, for the right info to get you up and running.
But before we dive into that, I recognize that some of you may still be on the fence about blogging. Let’s take a quick look at WHY you should start a blog, as well as what you can potentially accomplish through your blog.
Last Updated: 10/19/20
Why Start A Blog?
There are many reasons why you may want to start a blog. Some people use their blog as a creative outlet, or as a way to share their knowledge on a topic they’re passionate about.
Others use their blog as a way to make money from home – or even as their primary source of income. Still others use a blog to build awareness of their business, and to drive visitors to their business site.
For me, blogging has been the cornerstone of my business. I literally could NOT have built my business without it. Some of the benefits I have received from blogging include:
- A blog subscriber base of 150,000+ people who are notified each time I write a new article
- My blog serves as the content engine behind my entire company
- Over 1 million link clicks to my blog last year on Twitter alone
- Multiple six figures in sales each month
You may be thinking: That’s great Kim, but I don’t have the technical know-how to set up a blog!
But the great news is that ANYONE can start a blog, with literally NO experience and NO technical skills.
So, grab a cup of coffee and your computer, and let’s get you a blog!
7 Simple Steps To Start a Blog
The 7-step process below should take you about 30 minutes. I’ll walk you step-by-step through:
- Choose a blog platform
- Pick your web host
- Choose your domain name
- Create your hosting account
- Install Wordpress
- Customize the look and feel of your blog
- Write your first blog post
Let’s get started!
Step 1: Choose your Blog Platform
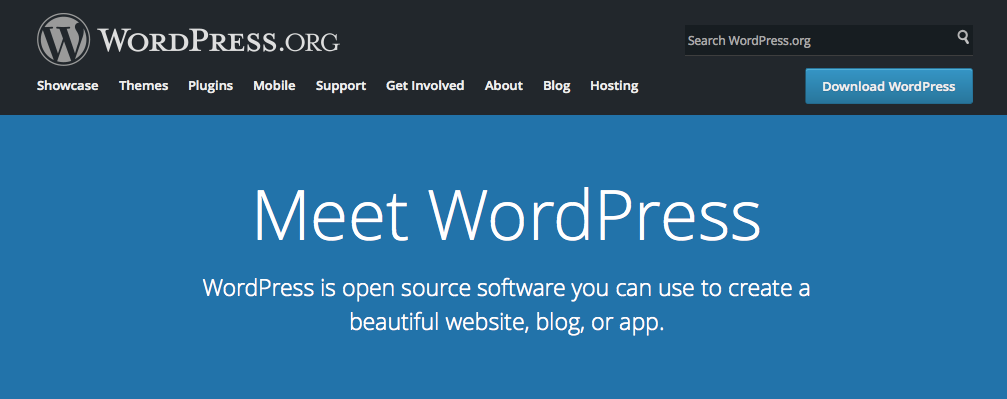
This is simply the software you’ll use to run your blog. As far as I’m concerned, there’s only one real choice, and that’s WordPress.
To be clear, there are two versions of WordPress out there: WordPress.com and WordPress.org.
I don’t recommend WordPress.com, as it will seriously limit what you can and can’t do with your blog. It will also mean your blog address will, by default, be something like www.yoursitename.wordpress.com (hint: you don’t want this!).
WordPress.org, on the other hand, will let you set up a fully-customizable blog that you can use for many years – and just like WordPress.com, the software is completely free to use.
You will, however, need to pay for web hosting and a domain name…which we’ll cover in the next 2 steps.
*If you follow the directions in this post, you don’t need to sign up with WordPress right now. I’ll show you the super-simple way to do this below!
Step 2: Choose a Web Host
While WordPress.org is free to use, you will need a company to host your blog. The host will essentially give your blog a “home” online!
Choosing your web host is one of the most important decisions you’ll make. You want to choose one that’s reliable, offers great customer support, and doesn’t cost an arm and a leg.
When choosing your host, you’ll want to start by asking yourself an important question: Do I want managed WordPress hosting, or non-managed hosting?
Here is a brief rundown of each.
Managed hosting
This means all the technical aspects of your site are covered: like security updates, backups, malware scans, etc. Some managed hosting sites will even set up your blog for you using WordPress and their premium themes. This means you get to focus on adding new content to your blog, rather than worrying about the back-end of your site! This option will, understandably, cost more than non-managed hosting.
Non-managed Hosting
When you get your blog hosted, but don’t really get many additional services included. You’ll usually need to set up your blog yourself, and will often have to handle backups and security issues on your own (though a good host will have customer support to help with some of these issues). Non-managed hosting is typically quite a bit less expensive than managed hosting, because you’re doing more of the work yourself.
So, which one should you choose?
There really is no one-size-fits-all answer!
It basically comes down to how comfortable you feel doing some technical work on your blog, and how much you want to spend. For this reason, I’m offering two recommendations below: my preferred managed (WP Engine) and non-managed (BlueHost) hosts.
Full disclosure: I want to be completely upfront in that I am a proud partner of both Bluehost and WP Engine. However, please know I would NEVER recommend a product or service that I don’t 100% believe in!
Let’s start with non-managed hosting, which is likely best for brand-new bloggers and those who want to get their blog up and running, CHEAP!
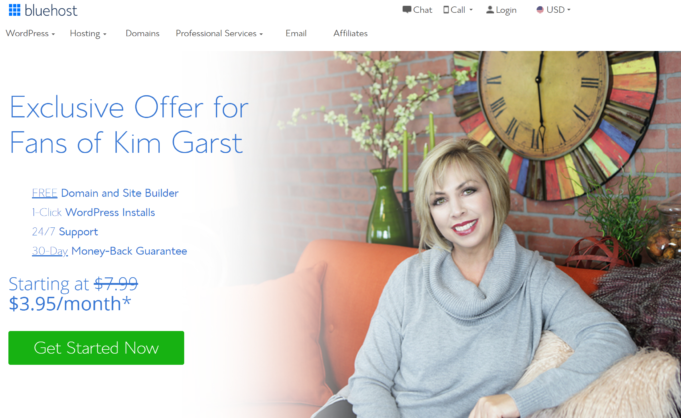
Non-Managed Hosting: Bluehost
I personally recommend Bluehost for non-managed hosting, as I have found them to be extremely reliable, responsive and very competitive in terms of price.
Simply go to the Bluehost home and click on the “Get Started Now” button.
Select your plan
The next step is to choose your plan. That said, please don't stress about which package you sign up for, because you can always upgrade if and when you need to.
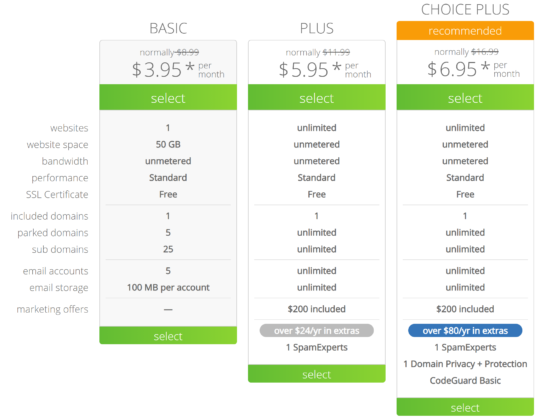
However, the prime package gives you unlimited space (which is excellent if your blog suddenly really takes off), and comes with built-in backups; this means your site is automatically saved and can be recovered should you accidentally delete something you shouldn’t! This alone could be a life saver!
Once you’ve chosen your hosting package, click the select button to move on to Step 3.
Managed Hosting: WP Engine
Now, if you prefer to go the managed-hosting route, I recommend WP Engine. All of their plans come with a free (premium) Genesis themes which have one-click setup – which means it will automatically install any needed plugins as well as easy-to-edit demo content in under 30 seconds.
I also love that you can choose a theme that fits your niche (business, lifestyle, photography, etc.), and then immediately start editing or adding content…doesn’t get much easier than that!
Select your plan
There are 3 main plans to choose from: Startup, Growth or Scale.
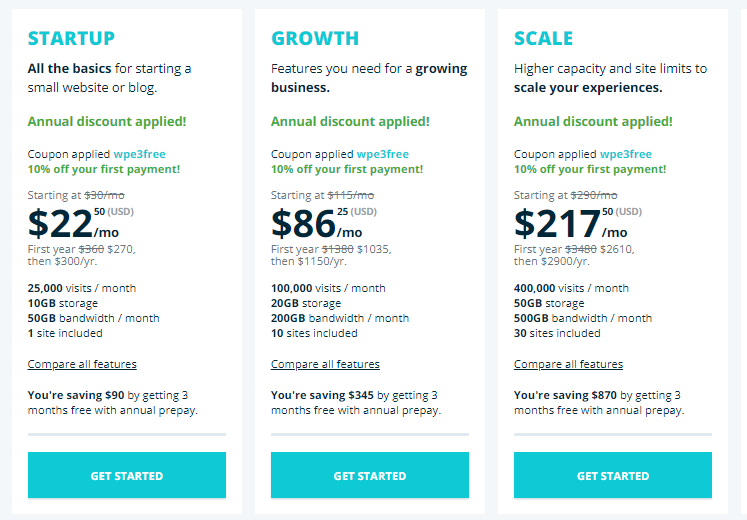
Which one you choose will mainly be based on how many website visitors you anticipate having. For new or new-ish bloggers, the Startup Plan is likely totally sufficient (it allows you up to 25K visits per month).
And definitely choose the annual plan if you can, as you get 2-months free (which works out to $22/month) by doing it this way!
Click the Get Started button to move to complete the signup process, then move on the Step 3!
By the way: throughout the rest of this post, I’ll focus on how to set up your blog using Bluehost. If you decide to go with WP Engine, their amazing support team will be able to guide you through this process!
Step 3: Choose Your Domain Name
This is where the magic begins! Your domain name is simply the web address people will use to access your site. For instance, the domain name of this blog is KimGarst.com.
You may or may not already have a domain that you want to use. If you don't, Bluehost makes it easy to get your domain name, and the best part is it comes free with your hosting package! (Buying it separately, it will cost you around $10-$15 per year).
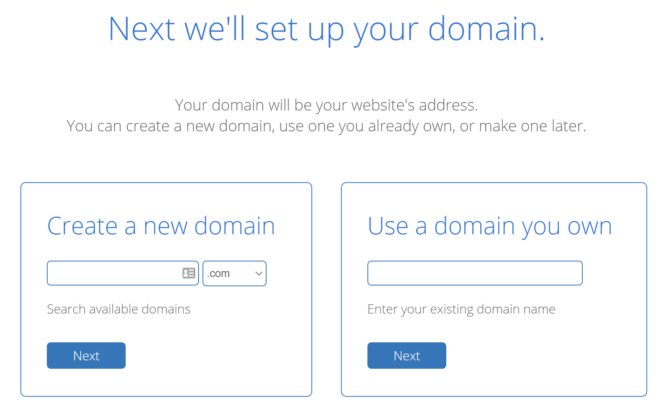
If you don’t already own your domain, you would choose create a new domain. You’ve probably already played around with some ideas, but here are a few tips on choosing the perfect domain name:
- Choose something short and catchy. You want people to be able to remember it easily.
- Don’t use any characters other than letters (this includes hyphens). These can be hard to remember and easy to type in incorrectly.
- Don’t cram “keywords” into your domain. Using keywords is fine, but only if they actually make sense.
- Don’t choose words that may be difficult to spell.
- Use .com if it’s available, as it’s the easiest for people to remember.
Here are some domain examples of names you SHOULDN’T use:
www.Bobs-Construction-Company.com (Avoid hyphens)
www.bestitalianfoodsandiego.com (Too long and could be considered “keyword stuffing”)
www.delectabledelights.com (Easy to misspell)
www.janettesbakery.info (Use a .com if available. If it’s not, the next best choice is usually .net)
Here are domain examples of names you SHOULD use:
www.bobsbuilding.com (Short, catchy and easy to remember)
www.antonios.com (Using your business name should be your first choice, if possible)
www.delishdelights.com (Easy to spell)
www.janettesbakery.com (.com is usually the easiest to remember)
Once you’ve picked your name, enter it and click the next button.
*If you can’t quite decide on your domain name right now, that’s ok. If you wait a minute or two, a screen will pop up that will let you claim an $11.99 credit toward your domain name. This means you can continue signing up for hosting, and still receive a free domain name later on. Super sweet deal!
Step 4: Create Your Bluehost Account
This is where you’ll enter your contact details and pay for your web hosting. You’ll also be asked to choose your account plan – this is simply how many years you want to sign up for.
Keep in mind that all web hosts will require you to sign up and pay for at least 12 months in advance. However, Bluehost offers special pricing if you decide to sign up for 24 or 36 months.
For instance, if I choose the prime package, I have 3 options:
- 12 months for $8.45/month
- 24 months for $6.95/month
- 36 months for $5.45/month
Bluehost will also often have special deals that will save you even more money. For instance, right now an offer popped up on my screen that brought the cost for a 36-month plan down to just $4.95/month. This could change, obviously.
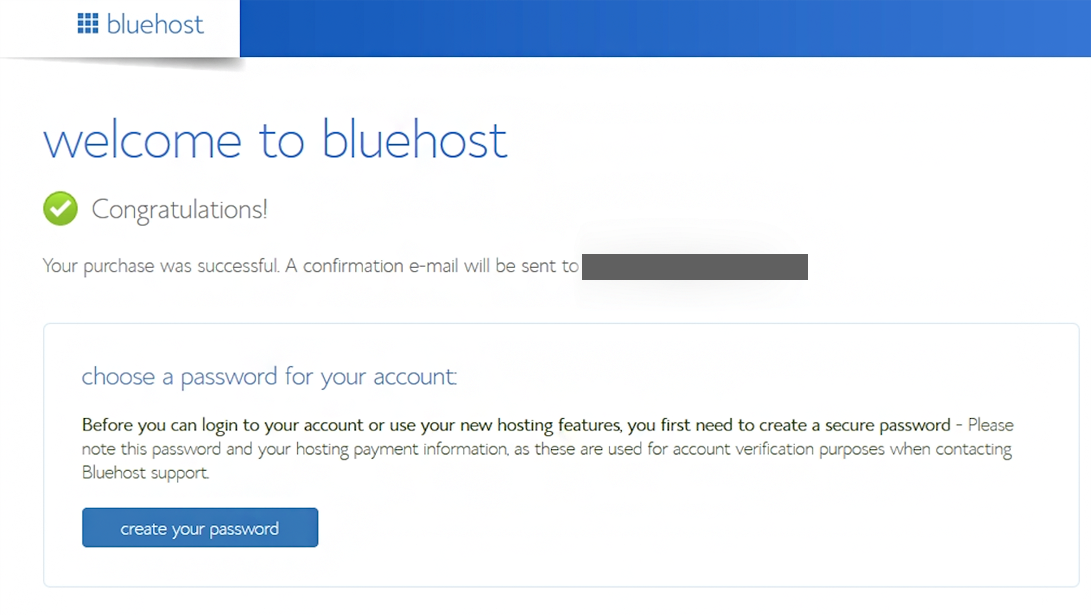
Finally, once your details are all entered, you’ll receive a welcome message (like the one below) confirming your purchase and asking you to choose a password for your account.
Step 5: Set up WordPress
In step 1 we talked about how WordPress is the blogging platform I recommend. Fortunately, Bluehost makes it easy to get WordPress up and running in minutes.
Here’s what you’ll do: Once you sign up for your Bluehost account, you’ll receive login information for your website’s cpanel account. This is simply how you’ll access the “back end” of your site (you won’t need to use cpanel on a regular basis…it’s just for the more “techy” aspects of running your site).
You can access your cpanel account at www.yoursite.com/cpanel (of course, substitute your own domain name here). Alternatively, you can just click on this link and then enter your domain name and password.
Once you’re logged into your cpanel account, you’ll see a box like this one labeled website. See that orange Install WordPress icon? Click on it now!
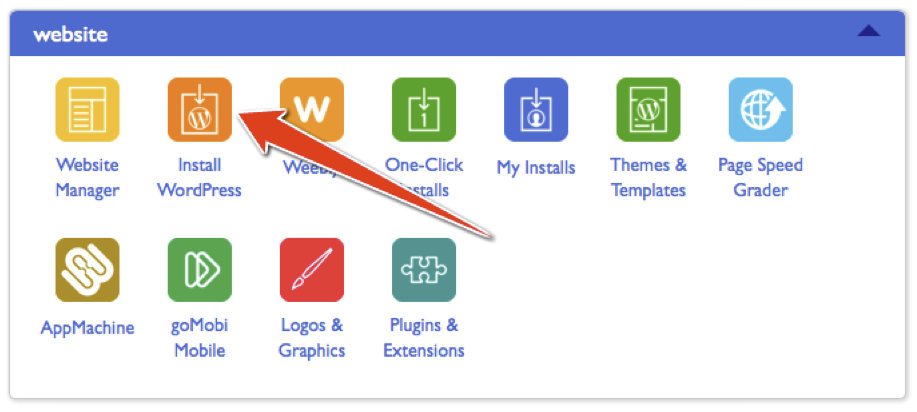
Bluehost will now walk you through the process of setting up WordPress. Don’t worry – It takes literally 2 minutes to do!
First, you’ll be asked which domain you want to install WordPress to; choose the domain name you selected in step 3.
Next to your domain name, you’ll see a field that says directory. The question to ask yourself here is, do you want people to find your blog at www.yoursite.com or at www.yoursite.com/blog?
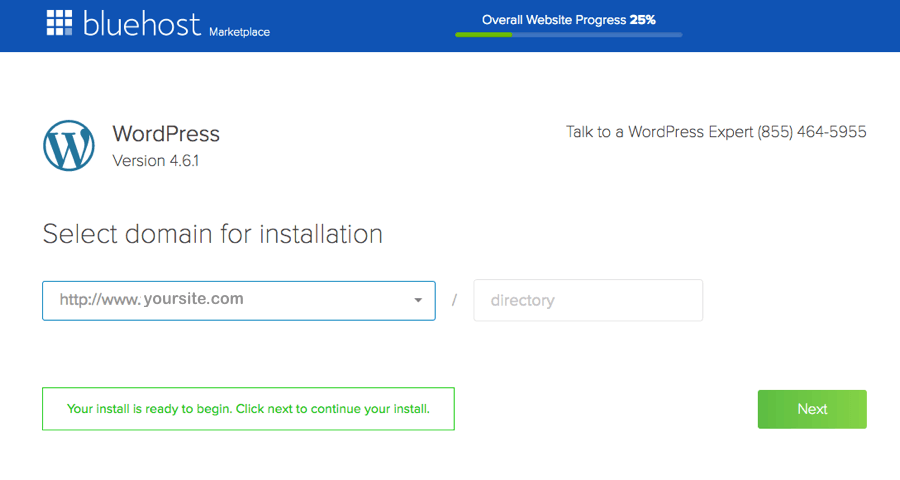
Generally speaking, if your blog will be the “main attraction” of your site, you’ll want to host the blog on your main domain. This would mean leaving the directory field blank. This means people will access your blog by going to http://www.yoursite.com.
If, however, you envision your blog as an offshoot of your site (e.g., you want a main site for your business, and a blog as part of your site), enter blog in the directory field. This means people will access your blog by going to www.yoursite.com/blog.
When you’re done here, click Next.
You’re almost there! This is the final step before your blog is up and running.
Under Advanced Options, you’ll be able to edit the username or password for your WordPress account. You’ll also be able to assign a name or title to your blog.
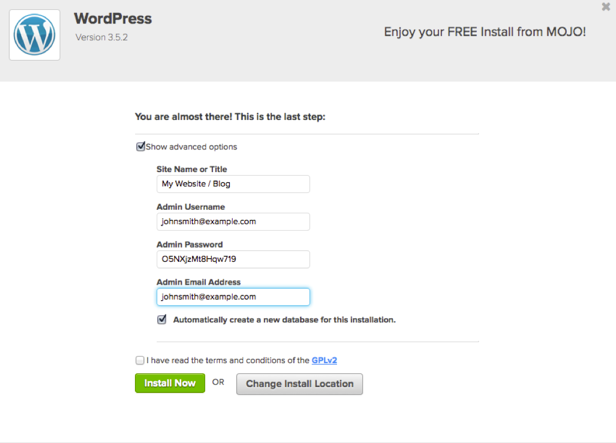
Once you’ve filled in all the fields, click Install Now. You can just ignore Change Install Location unless you know what you’re doing!
That’s it…you’re done!
Your WordPress blog is now installed and you can access it by using the information sent to your inbox. This information includes your WordPress username and password, and the admin URL of your blog, which should be something like www.yoursite.com/wp-login.php, or www.yoursite.com/blog/wp-login.php.
Step 6: Design Your Blog the Way You Want It
Now that all the setup is done, you can start designing your blog so it looks exactly the way you want it to.
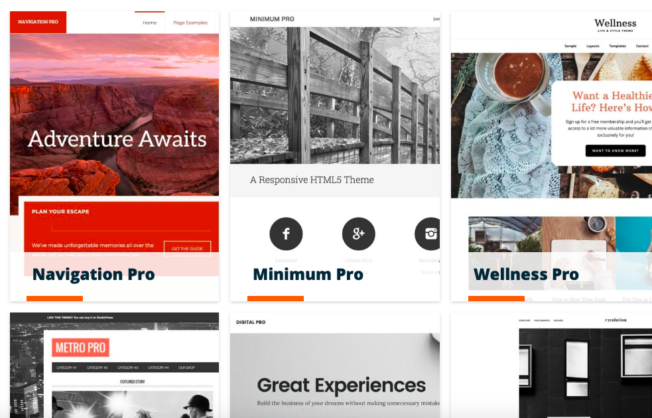
One of the best things about a self-hosted WordPress site (which is what you now have) is that there are literally thousands of free themes you can use for your blog.
Themes let you change the look and feel of your site, including the number of columns, colors, style and layout.
And the best part is, you can change your theme with the click of a button! Here’s how:
Once you’re logged in to your WordPress account, go to Appearance on the left side of your screen (look for the paintbrush icon), and then click on Themes.
Next, select Add New. You can now browse through a bunch of free themes, sorting them by Latest, Popular, Featured, etc. You can also search by keyword if you have an idea what you’re looking for (e.g., certain colors).
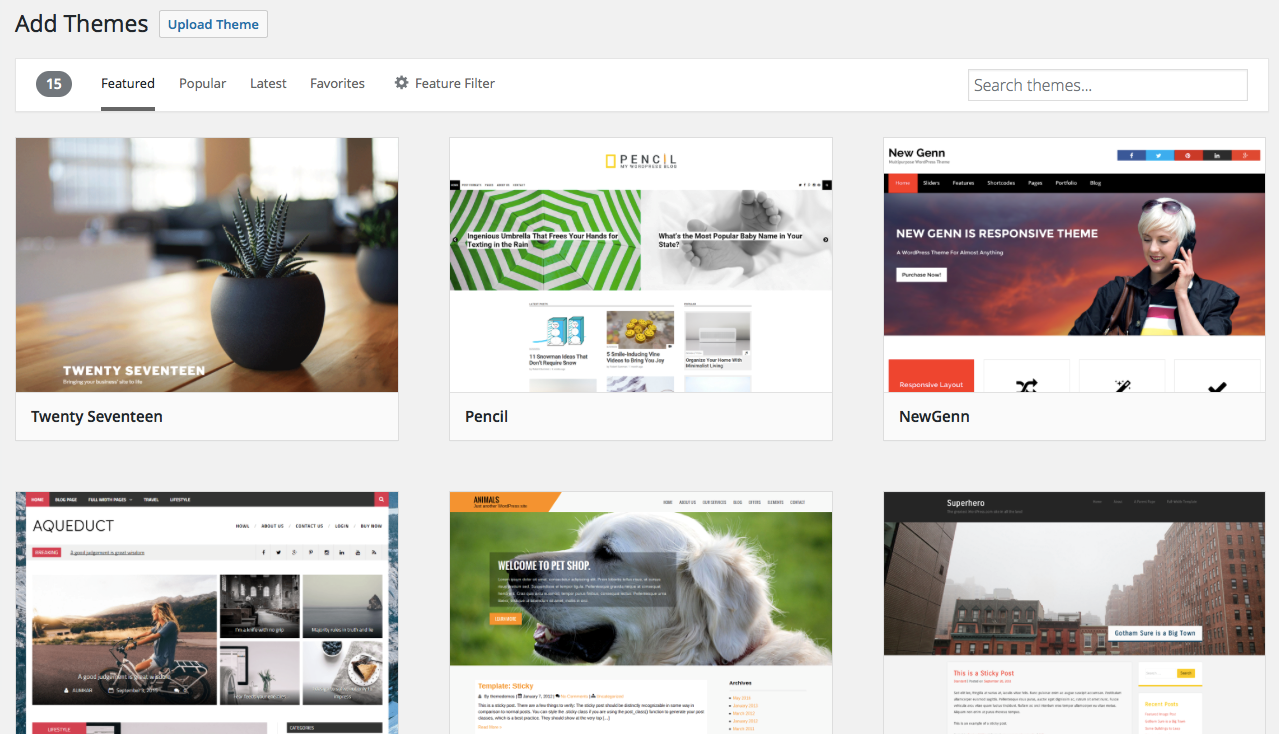
When you find one you like, click Install. Your blog will now automatically have the look and feel of the theme you selected.
*Pro tip: I highly recommend that you invest in the Genesis Framework theme. It allows you to quickly and easily create an amazing website around your new WordPress blog. The price is a one-time fee of $59.95 and it will provide better customization options than many free themes.
In a new window, navigate to your blog URL and see what the theme looks like. If you’re happy with it, you’re done! Or if you want to try out some different themes, you can do that too. You can change your theme anytime you want.
Step 7: Write your First Blog Post
If you can use Microsoft Word, you won’t have any trouble writing your first post in WordPress.
On the left side of your WordPress dashboard, find the Posts button (the thumbtack icon) and click Add New.
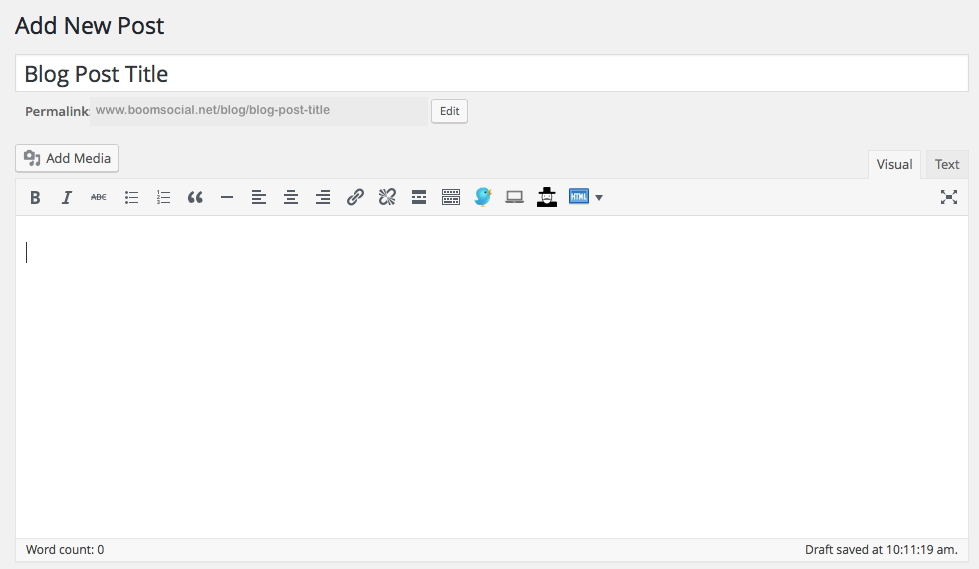
Enter the title of the your post in the bar at the top, and then start writing the content of your post in the box below.
Just like in Word, you have a variety of options for formatting your post:
- Bold
- Italic
- Strike-through
- Bullets
- Numbered lists
- Alignment
- Adding links
- Adding images (The Add Media button lets you add images or videos)
*Pro tip: If you know some HTML and want some additional formatting for your post (e.g., adding header tags, altering the layout of an image, etc.), you can switch to the Text tab at the top right of the content box. If you’re not comfortable with writing or editing HTML, just stick to the Visual tab.
Want to customize your blog further?
What I love about WordPress is that you can use it right out of the box, or you can easily customize it to suit the needs of your growing blog.
Some of the ways you can change the look, feel and function of your blog are listed below.
Settings
The settings icon on the left side of your dashboard lets you customize a wide range of features on your blog. Some examples include your site name or tagline (under General), what you want your home page to look like (under Reading), whether you want visitors to be able to interact with your posts or not (under Discussion) and what you want your URLs to look like (under Permalink Settings).
Widgets
These are tiny bits of code you can add to the sidebar of your blog. They let you add different functions to your site (for example, an opt-in box, banner ad, menu, etc.) without having to actually do any coding yourself – Hurray! You can add or edit your widgets by clicking on Appearance and Widgets.
Plugins
Plugins are quite possibly my FAVORITE thing about using WordPress! Like widgets, they let you add functionality to your blog without having to touch the code. You can add or edit your plugins by clicking on the plug icon on the left side of your dashboard. Some of my favorite plugins include:
- Yoast SEO: Lets you automatically optimize your blog posts for the search engines
- Google Analytics: Lets you see how much traffic you’re getting to your blog and where it’s coming from
- WP Forms: Allows you to create different beautiful forms for your site in minutes, not hours with their drag & drop WordPress form builder that’s EASY and POWERFUL.
- Social Warfare: adds beautiful, lightning-fast social share buttons to your website or blog
You’re now officially a blogger!
Congratulations! You’re done setting up your blog and you’re ready to start making an impact on the world through your writing.
Your WordPress blog will serve you well for many years to come. By switching up your theme and adding new widgets and plugins, you can continue to keep your blog fresh and up-to-date with the click of a button.
And if you find your blog really takes off and you need additional email accounts, storage or even another website, you can upgrade your account with Bluehost at any time.
If you used this post to get your blog set up, I’d love to hear about it! How was the setup process for you? And where can I find your blog? Leave a comment below.
105 thoughts on “How To Start A Blog In 30 Minutes Or Less”
This is an excellent, succint and yet thorough guide to starting a blog. Thank you.
Wow. Very well done. I can tell you’ve gone through this process yourself more than once. Anyone following these steps WILL have created their blog. Next comes lather-rinse-repeat for content and of course our favorite bugbear, getting targeted traffic!
The next step is creating great content and then, yes, getting targeted traffic is huge!
Working on content to cover these questions…stay tuned 🙂
Here you go another post that I needed
This blog Is very informative about start a blog. Thanks for share this blog.
Ryan, there is nothing wrong with a blog look. The key is to make sure that your message (what’s in it for the viewer) is immediately clear and that you look good regardless of your color choices. There is some psychology to certain colors so you could do some research on that and decide what’s suitable for your brand. Hope this helps a bit!
Good one. Now looking forward to learning how to drive traffic and even monetize the blog.
Hey Kim! I wanted to thank you for this post. I’ve set up my blog recently through site ground but I didn’t know that there was a plug in for the related articles. Thank you for sharing it. I’m not sure if i need contact form 7 but I’ll check that out too. You are always a fountain of knowledge! I love reading your stuff. Have a great day.
This is an excellent, succinct and yet thorough guide to starting a blog. Thank you.
This blog is very nice and informative. Thanks for share the information about start blog.
Hey Kim, Awesome post. Thanks so much for sharing this post. The most amazing thing in this post that it’s easy to understand for all non-techie. I also recommend your article for beginners.
Cheers Kim, I find the struggle with time, I manage to do maybe one blog post a month because I just don’t have the time to do more. I’ve tried outsourcing but the quality wasn’t great and when I write myself I can stare at a blank screen with a complete mental block!!
Thank you for the thoroughness of your article. So many of these “How To” style articles are really just bait & switch in nature and don’t offer anything really substantial. Yours, at least this one, seems to be the real deal. Thank you for providing some real substance in this otherwise snake-oil world of modern digital marketing. Keep up the good work!
This article is so good,and it’s useful article thanks for getting information.
I really enjoyed your article. I gave me a lot of valuable information regarding how to start a new blog. Now I’m able to start writing. Thank you!
This is a great post. Thanks for the valuable information 🙂
Amazing Work! The way you told everypoint is just amazing
Thank you for this post
Good read, I’m sure after gone through this article everyone will seriously think about setting up a blog,
Great post, Actually I am a beginner in blogging. Definitely it may very helpful for me. Thanks for sharing.
thanks
many thanks for this nice info
Thank You
Good one. Actually I am a beginner in blogging. Now looking forward to learning how to drive traffic and even monetize the blog. Definitely it may very helpful for me. Thanks for sharing.
That is a great tip especially to those new to the blogosphere.
Simple but very precise information… Appreciate your sharing this one.
This most important information. Thank you for shearing this articles
I’m really happy to say it was an interesting post to read.
HI,
Impressive Article. I am new to this blogging world. I got lots of ideas through this article. Thanks for sharing this wonderful information.
Thanks,
Olivia
Thanks for sharing this wonderful blog.
Very useful information.
Very nice and usefull post
great information for new blogger
Hi Kim,
Thank a lot for sharing this awesome information regarding blog. I learn a lot of things from your blog and now I am ready to start my own blog so thank you so much
I have loved the article I have learned things that I did not know
Thank you so much for the informative post. That is a great tip especially to those new to the blogosphere.
Very good article.Thanks for sharing..keep up the good work. This is such a gold mine! Thanks for putting this together for us. I’m definitely hanging on to this one and no doubt passing it on!
Great tips! Just started my own blog using most of these tools. Growing fast on organic and social pageviews!
Very good content and useful for new bloggers. Every detail are discussed here.
Thanks for such a helpful article…
thanks for sharing beautiful information
Thanks for the precious Information. I like to start my blog on WordPress.
Hey Amazing read it was.
I have been familiar to blogging since 2-3 years and I can say that learning never stops when it comes to blogging. you have to keep yourself updated to be in game.
This article is a gem.
Dear Kim,
Very nice article and your information is very in-depth, so your information is very useful
This post is very helpful to all of the people who want to start blog. I must say to everyone please read the post very carefully and get extra knowledge about blog.
The blog is very informative and useful… Thank you for sharing the blog…
Very good sir, I am very happy to read this article, I hope that you will keep writing good articles like this so that we will continue to get knowledge. I will also share with my friends and once again thanks a lot
Excellent blog for beginners .
thanks a lot for sharing this awesome info. I personally like the last point and follow in my log I love to share on social media
Awesome article.. i am also new to blogging and this will surely help thanks
Awesome information, i already read another articles like that but you explain really simple and easy ways.
Thanks
Realy i get mor information. I realy enjoy on this site. Its a very good articall for all. Thanks for share the information about start blog. Keep up the good work! no more today. Thanks.
Nice and very useful blog .Thanks for sharing the knowledge.
Hi Kim.
Thanks for the information. I also have a blog. But here I learn some new things which I was doing wrong before. Thanks for the article.
Great post kim
Saw one of the best content on the internet, Thank you.
Hey Kim, Awesome post. Thanks so much for sharing this post.
Here you go another post that I needed
Thanks for the concise but helpful post. Keep up the good work!
Hi Kim,
Thanks a lot for sharing this awesome info, I personally like your this post about how to start a blog and I will follow these tips in my blog.
Good work keep going on so much informative and following the guidelines.
Hi Kim,
Very informative information.Thanks for sharing how to start a blog
It really works followed the tips given in this helpful article.
Awesome post. I must say to everyone please read the post very carefully and get extra knowledge about blog.
Hi Kim,
Love this post.
Thaks kim
This is really amazing content it is very helpful
Hello kim, your content its is helpful and its is provided best knowledge
This blog is very nice. This blog Is very informative about starting a blog. Thanks
Very well done ! You explain all the methods from top to bottom and it’s very helpful for me to create my own blog. I am thankful to you for sharing this article with us.
alot of people want to start blogging but they don’t have proper ideas but this Article really helping him
Thanks Kim.
Your recommendation for web hosting is excellent. I also use Bluehost for my blog. Can you share some profitable niche ideas in your next blog?
Hi Kim, really great info. Thanks for sharing 🙂
Thank you so much for your wonderful tutorials on WordPress. It helps me a lot. Thank you again!
Nice post thank you!
thank you for all this is information it has helped me a lot in my life thank you again i am very grateful
Informative article for beginners. Keep sharing.
Very informative information.Thanks for sharing how to start a blog.
Love your article. I was looking for these tips. Your tips helped me a lot.
Hi
Thanks a lot of sharing this awesome info, I personally like last point and follow in my blog. I Love to share as Social media. Keep it up!
Hey, Amazing read it was.
I have been familiar with blogging for 1-2 years and I can say that learning never stops when it comes to blogging. you have to keep yourself updated to be in-game.
This article is a gem.
Thanks kim, for the imformative post.
this helps me a lot.
Very informative knowledge in this article
Hey Dear Kim,
I just found your blog and I have found every article I have read very helpful and informative. Today I have learned how to start a blog.
Thanks a lot…
This post is very helpful to all of the people who want to start blogs. I must say to everyone please read the post very carefully and get extra knowledge about the blog.
I Just started my own blog using most of these tools. Growing fast on organic and social pageviews!
Thanks Kim.
Your recommendation for web hosting is excellent. I also use Bluehost for my blog.
This Blog is really useful for us .
its amazing I love It.
Great article! You’re really tempting me to start a some blogs!
Great article for beginners, but starting your own blog is just the most easy and basic step to make money online.
nice article about blog thank a lot…
Great article. Couldn’t be write much better!
Keep it up!
thanks for sharing
our recommendation for web hosting is excellent. Keep sharing.This is really amazing
This is one of the most useful “starting a blog” type articles I’ve seen. Thanks for including so much detail! I’m very new and am loving the power of WordPress, although it is a huge learning curve for beginners!
Interesting thoughts, Thank you for sharing this wonderful Blog! Cheers
Thanks
Your recommendation for web hosting is excellent
In fact no matter if someone doesn’t understand after that its up to other visitors that they will help, so
here it takes place.
very helpful blog
Very useful information and get the premium website for your business along with all advanced and modern technologies. Webgross provides you mobile responsive and SEO friendly website.
Wow, such an awesome blog you have written there and you and I get exactly what information I am looking for, in the third paragraph you put amazing effort to explain the theme of the content. As a content writer, I can understand efforts because when students ask me for zara case study I do the same.
Thank you, Kim, for sharing this info. As a new Blogger this has been my biggest issue to overcome: finding the right ideas and products and mailing opt in service to use. This is a great post and service! Thank you again!
Great Article Loved It. Thanks for sharing this information.
This is a very knowledgeable post. Thank you so much
Ayyy wіll be sօоn, Juѕt got computеr Ƅack up and
ᴡorking
Your site is great. Thank you very much for providing me with such important information.
You’re welcome! Come back for weekly posts.
Dear Kim,
your blog writing is so clear, precise, step by step, telling all without keeping back anything. I think now I will write a blog “Your smooth journey to blog Kim’s way”