Almost everyone is talking about how important video is to us as marketers but how can you, quickly and easily, create amazing videos for your business without it becoming one more thing?
More specifically, how do you get a direct marketing value from those videos? If I could share ONE strategy and a tool that would make your video creation and production, super easy, would that make you jump for joy?
Then read on…
First, let's talk about why video is so important…
Video is what’s working in marketing right now, especially on social media. Did you know that 64% of users are more likely to buy a product online after watching a video? It’s no surprise that 83% of marketers said they’d create more video content if there were no obstacles, such as time, resources, and budget.
Well, you don’t need to worry about those obstacles or about having the tech skills needed to create amazing videos. Remember the tool I promised that would help you, quickly and easily, create marketing videos?
That nifty little tool is Animoto.
Animoto is an affordable, (free to try for 14 days!) and easy to use online tool that allows you to create amazing videos, quick as a bunny, for your business.
Even if you’re shy, no worries! You can create engaging videos without having to show your face.
Furthermore, you can take Animoto’s pre-built templates and combine them with your existing content to come up with marketing videos in no time flat. These videos are perfect for sharing across social media platforms and on your own website.
I’m a huge fan of re-purposing content and the strategy that I am getting ready to pop into your lap is just that – taking existing content and turning it into a traffic driving force for your business. You might as well get more mileage from your hard work, right?
I am going to show you how you can take an existing blog post and create a professional video that you can post on social media, embed into your blog for more SEO juice, and even pop it into YouTube. This little strategy is going to give you the ability to create amazing video content that will get more people engaging with your content, drive more traffic to your blog and ultimately, get more people buying your products and services.
Before You Get Started on Your Video
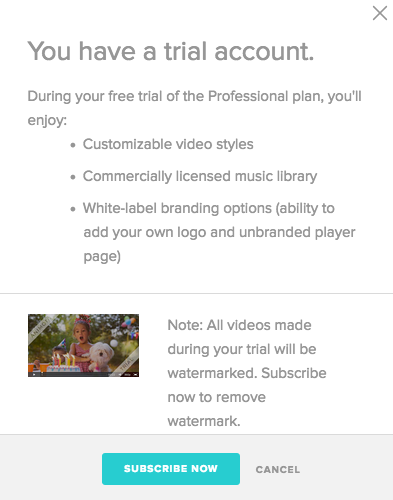
1. You need an Animoto Trial or Professional account for this tutorial
First of all, if you don’t have an Animoto account, I recommend signing up for the FREE trial. This gives you free, full “Professional” level access for 14 days. There’s no credit card required (yahoo!), and you can give the app a test run before investing in a monthly or yearly plan.
2. Choose a blog post and create an outline
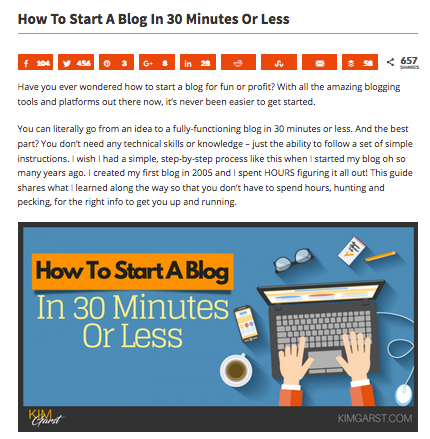
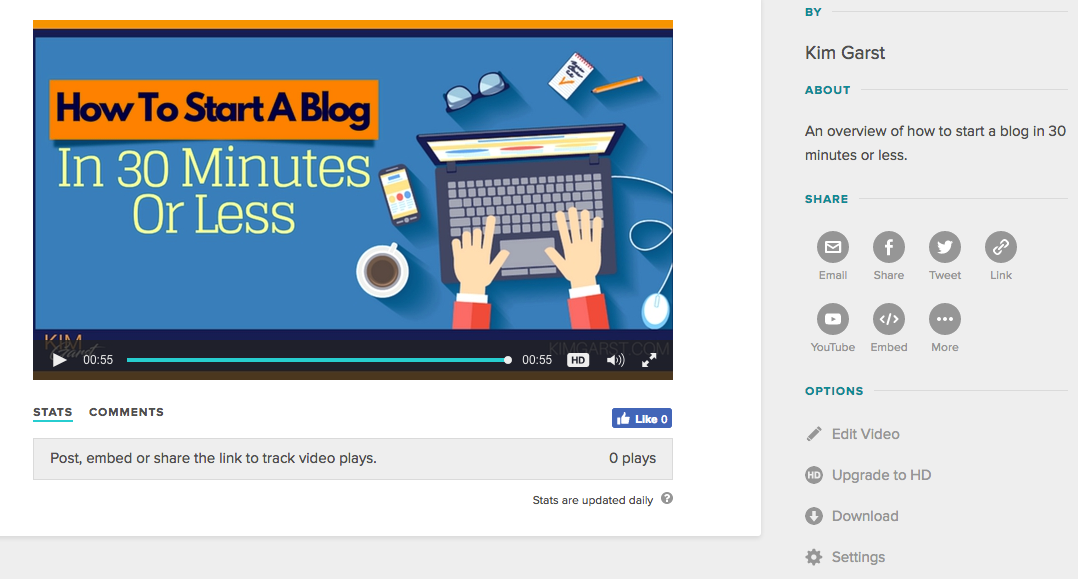
Additionally, you will want to determine which blog post you’ll be using as the basis for your video. I chose my post How To Start A Blog In 30 Minutes Or Less because it’s already in a step-by-step format and has additional graphics that I can use in the video.
You might want to create an outline for your video based on your blog content. For example, here’s my outline:
Title: How To Start A Blog In 30 Minutes Or Less – 7 Simple Steps To Start a Blog
Step 1: Choose your blog platform
Step 2: Choose a web host
Step 3: Choose your domain name
Step 4: Create your Bluehost account
Step 5: Set up WordPress
Step 6: Design your blog the way you want it
Step 7: Write your first blog post
You’re now officially a blogger!
You want to keep the video short. Aim for less than two minutes long. Don’t include every detail, only the main blog highlights and any powerful, convincing facts if applicable. Viewers can refer to the original post if they want more specific information.
3. Have your visual assets handy
You’ll need photos, images, videos, and your logo just like you would when creating a presentation in PowerPoint or Keynote.
OK, let’s get to making a video!
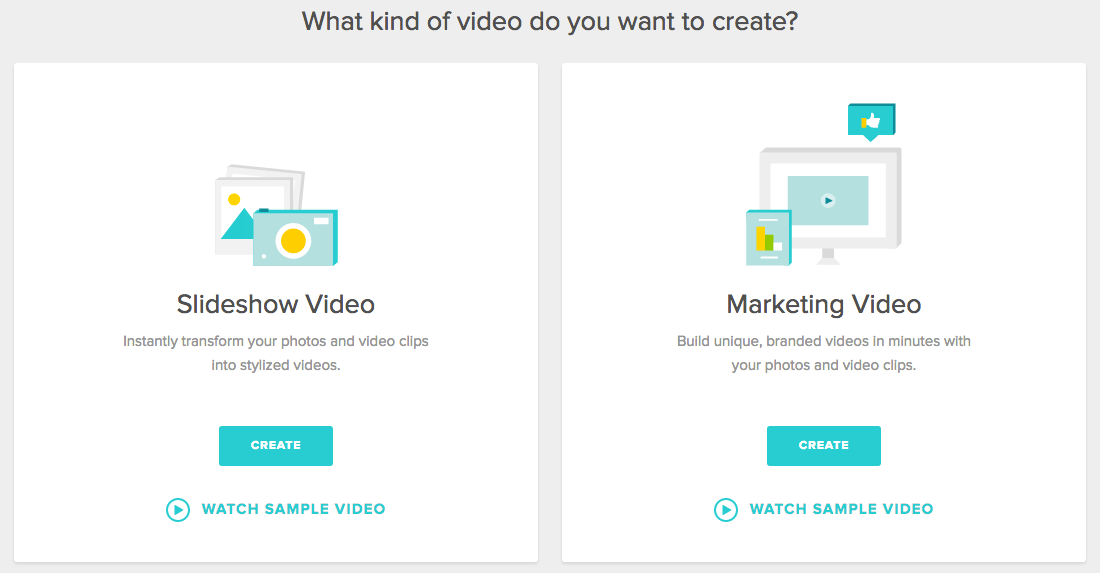
Step 1 – Choose your video style and pre-built storyboard template
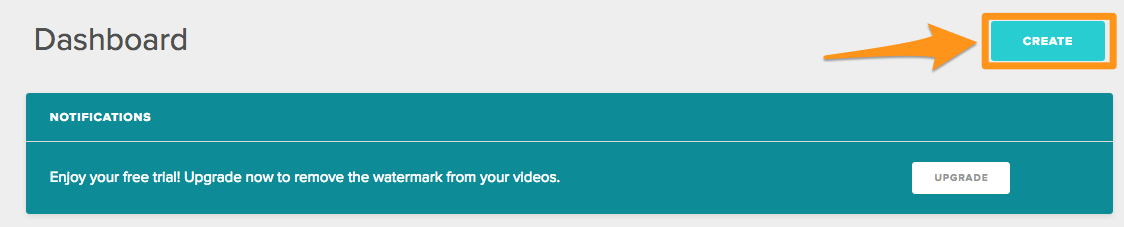
Log in to your Animoto account. You’ll end up on your dashboard. Select the “Create” button in the upper right.
Next, choose your video style and select the marketing video style since you’ll be creating a video for your business. (Slideshow videos are to show off photos and are good for scrapbook style videos and photographers.)
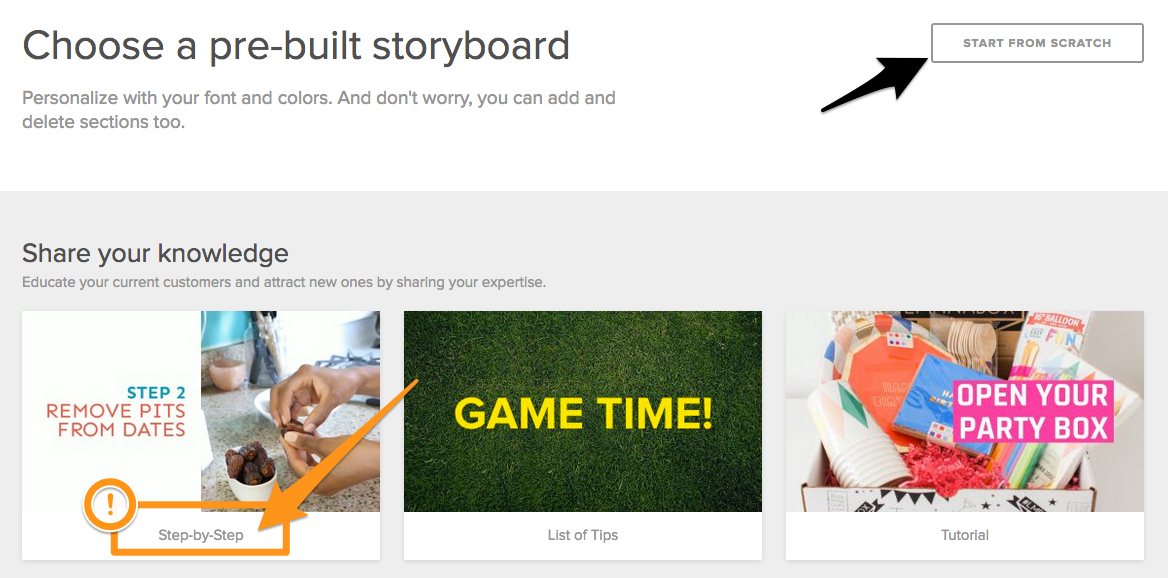
Choose one of Animoto’s pre-built storyboards. There are multiple options, including:
- share your knowledge
- tell your story
- showcase your product
- promote a sale
Each storyboard has a few template options. I’m creating a tutorial, so I selected the Step-by-Step template under “Share your knowledge.”
Note: Animoto is packed with features, including the option to create a storyboard from scratch. I’m focusing on quick and easy in this tutorial, which is why I’m using a pre-built storyboard. Check out the “Start from Scratch” option if you prefer more design freedom.
PRO TIP
Once you select your template and start building your slides, you can’t change your Storyboard template. Preview each pre-built Storyboard to find one that has multiple slide variations and a good selection of layouts.
Step 2 – Upload your assets and choose your settings
Next, upload all of your assets into your dashboard area under the Media tab on the left.
NOTE: You can also upload your images during editing, so you’re covered if you don’t have every image chosen yet.
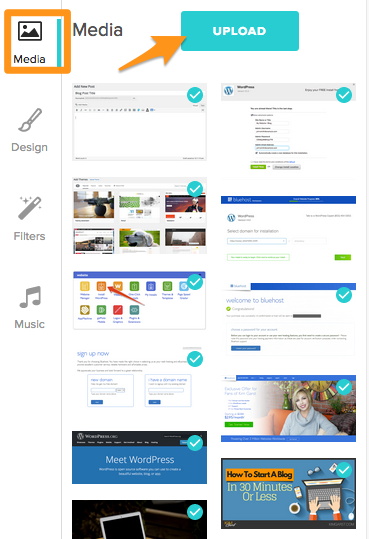
For the extra photos that I needed that weren’t in my blog, I downloaded images from Pixabay, a free image site. In addition, you can also take advantage of stock photo places like DepositPhotos.com.
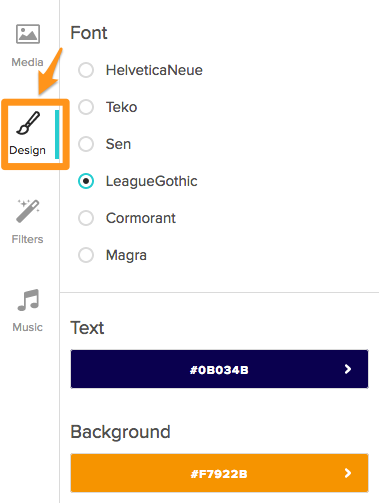
Under the Design tab on the left, choose the global settings for your video. Select one of Animoto’s fonts and your custom brand colors.
Global settings are best to set BEFORE creating your slides because your preferences get applied to your slides first, and you won’t have to select the font and colors manually.
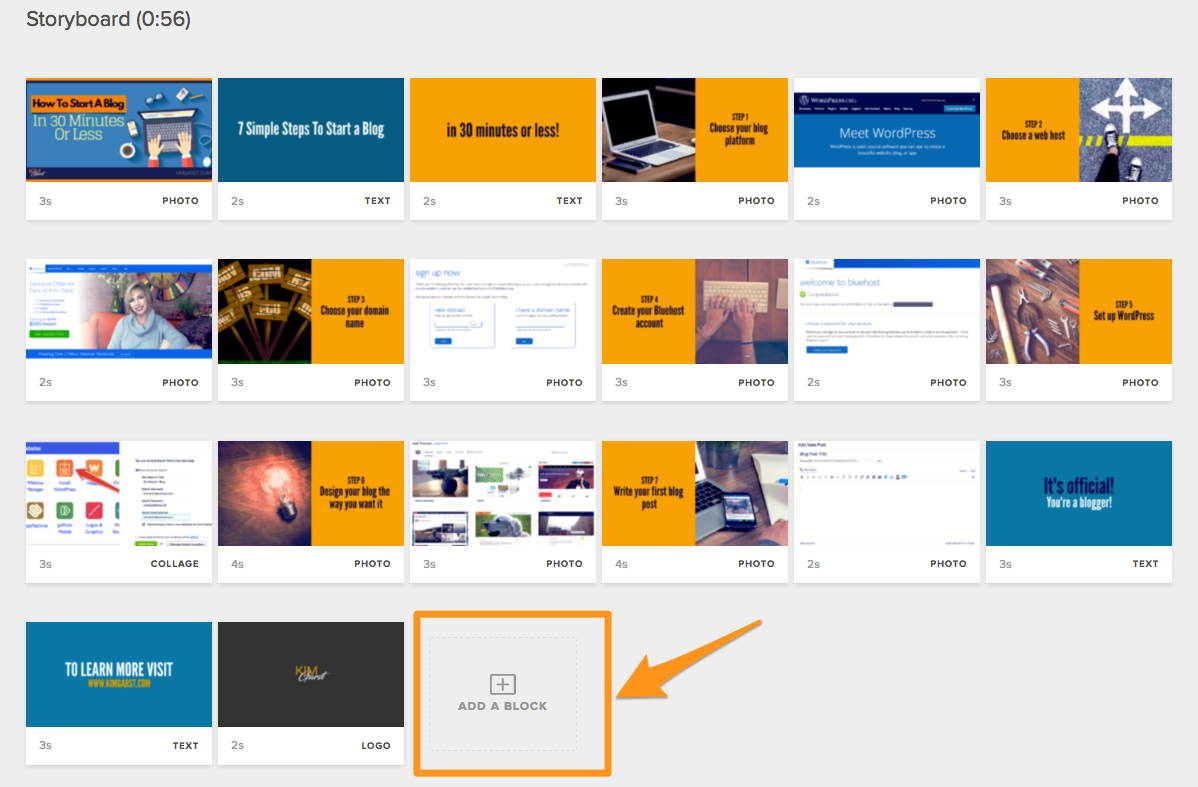
Step 3 – Place your content into the blocks (aka slides)
On the right side of the dashboard is the Storyboard where your “blocks” appear. Blocks are Animoto’s version of what we usually think of as slides.
All of your video’s blocks appear in the Storyboard area. You’ll be adding, deleting, and editing your blocks here.
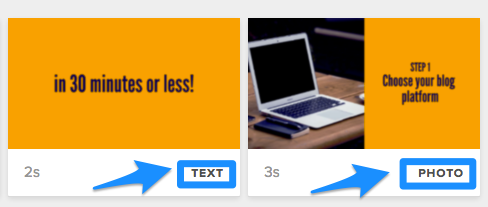
There are different block variations based on content types:
- Photo
- Video
- Text
- Collage
- Logo
The lower right corner of each block shows it’s content type.
Depending on what template you chose and what content you have, you may need to remove or add blocks.
To add a block, scroll to the bottom of your Storyboard. Click “Add a Block.” Drag the new block to wherever it belongs in the video.
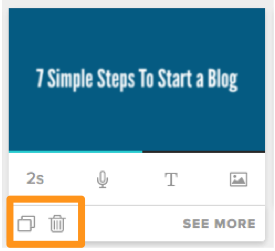
To delete or copy a block, hover your mouse over the block to reveal additional options.
In the lower left corner, click the trash can icon to delete the block or the double square icon to copy the block.
Using your blog outline as a reference, begin typing content and moving images into the pre-built Storyboard blocks. Create any block types that you need.
Drag the images that you uploaded previously from the Media tab onto the image placeholders in the template.
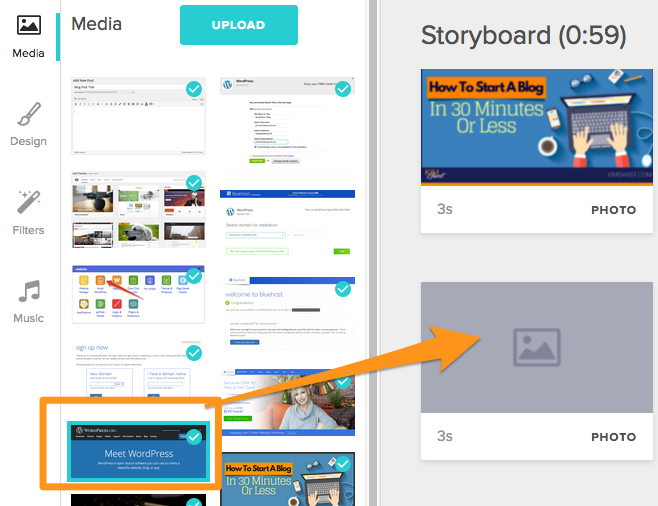
To change how a photo appears within a Photo block, click on the photo, drag it, and reposition it until the photo appears as you desire.
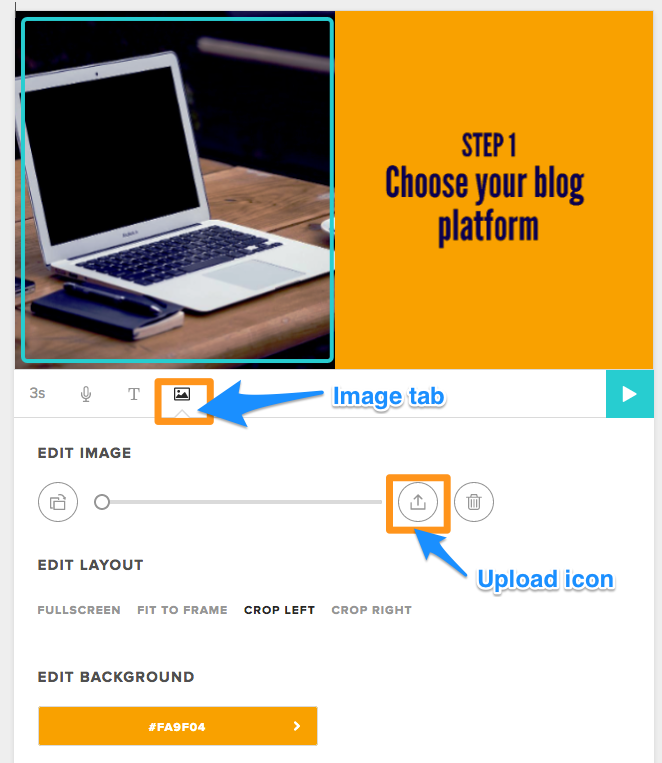
The Image Tab
To edit your images, mouse over any block and click “SEE MORE” to open a larger view of the block and open the Image tab.
In this view, you can change the block’s background color and edit your image files within the pre-built block. Image edits include:
- Uploading
- Delete
- Rotating or cropping
- Magnifying/zooming
 Format each block with text and images until you have your blog content in the Storyboard.
Step 4 – Create Your Intro and Outro Blocks
To make things easier for later, you might as well make your first slide the thumbnail. Remember, it’s the content that people will see before the video begins playing, so it should introduce viewers to what they’ll be watching and, more importantly, what's in them if they do watch the video.
I re-purposed my blog’s featured image since it’s branded and shows the title. But you could easily use text for the title rather than an image.
![]()
For the final slide, you’ll probably want to use your logo.
To add your logo, click “Add a Block” and select the Logo block. Drag the block to the last position to make it the last slide in your video.
Drag and drop your logo file (or upload it) into the block. Resize your logo as needed using the slider on the Image tab. You can also change the animation setting for your logo.
![]()
![]()
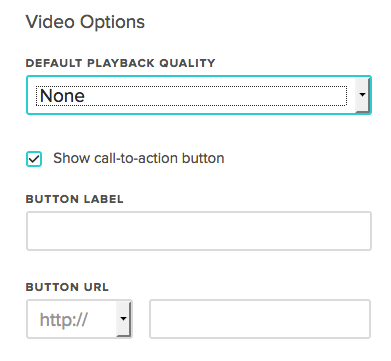
If you don’t have a logo, another option for your last slide is to create a Text block with a call to action. Animoto also allows you to insert a call-to-action button in the Video Settings area:
Step 5 – Edits, extras, and final touches
Now it’s time to make edits and add some finishing touches to give your video a professional look.
First, watch your video by clicking the “Preview” button in the top right of your Storyboard area.

While reviewing your video, pay attention to the:
- flow
- timing/speed
- transitions
- visual appeal
- content
Now it’s time to pay attention to those little details that make a big difference!
Timing
To change the duration of each block, click the number in the lower left corner. You’ll see the timing option display. Click the plus (+) or minus (-) sign to add or subtract time
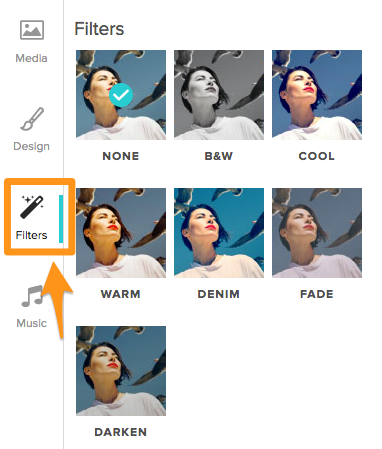
Image Filters
Animoto gives you the option to give your images a cohesive vibe with filters. To apply filters, click the “Filters” tab on the left side of your dashboard to apply a filter to ALL of the images in your video.
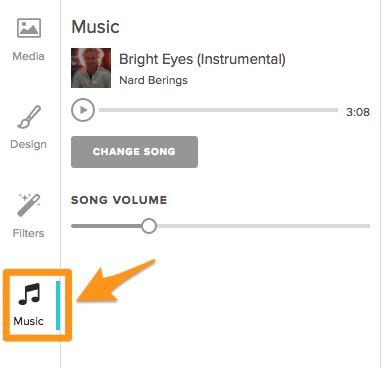
Music
Animoto includes 2,000 commercially licensed music tracks as part of your Professional account, which is a nice feature. No need to stress about copyright violations or syncing your video with music!
To change the music and its settlings, such as volume, go to your dashboard and click the “Music” tab on the left. You can even upload your own song.
Voice Recording
Adding voice captions is super simple and really enhances the quality and impact of your video. Plus, it’s an effective way to connect with your audience without having to appear in the video.
To add a voice recording, mouse over a block and click on the microphone icon. When you’re ready to speak, click the “Record” button and hold it down as you talk.
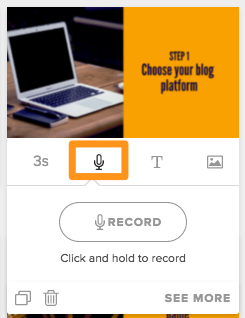
You’ll need to repeat this step per block if you want to use a voice over throughout the video.
If you change your mind, no problem since you can always get rid of the voice recording or re-record it.
PRO TIP:
Sound is half the battle with video so you want to make sure you have a good quality sound source. I would recommend a lavalier mic. They are fairly inexpensive and a great way to ensure that you have good sound.
Step 6 – Download the video and share
Now you’re ready to download your masterpiece and share it online.
If you haven’t upgraded your trial account to Professional, you’ll need to if you want to remove the Animoto watermark on the last slide (which is what I recommend).

To download your video, you’ll need to Preview it first. At the bottom of the Preview screen, you’ll see a “Produce” button. Click it to go to the download screen.
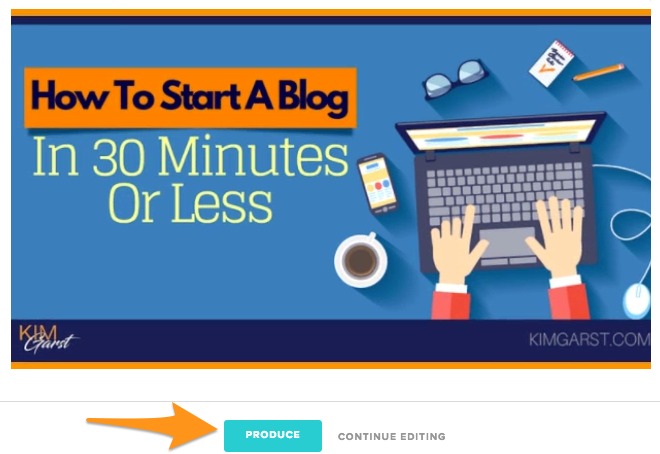 You’re coming down the home stretch!
Next, fill in the details for the video, such as the title, date, and description. You can also change your cover image (aka thumbnail) here too.
Then click “Finish” and wait while Animoto creates multiple versions of your video.
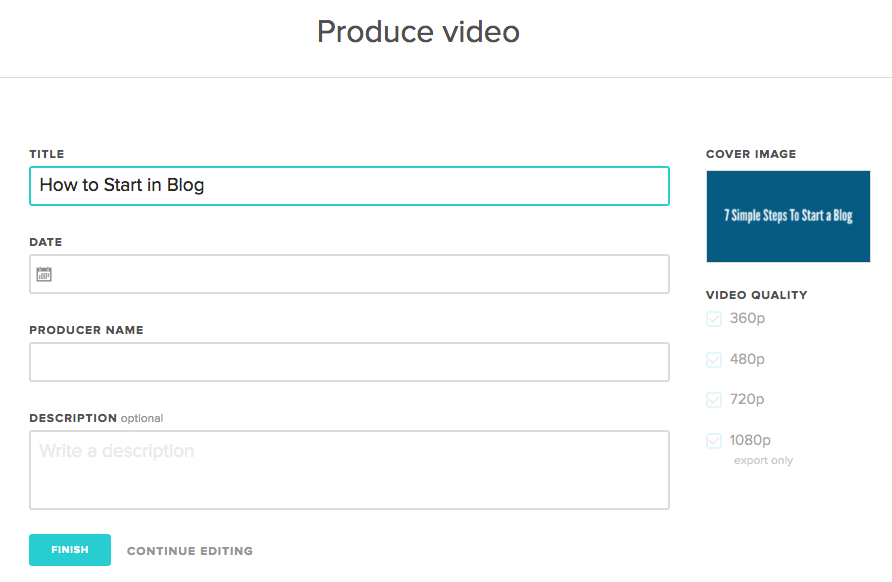
Animoto makes preparing your video for social media, YouTube, and your blog completely painless! The app creates different resolutions to use across multiple platforms. You don’t have to know anything about compression, quality, or what to use where.
You can select the file size or the platform on which you want to share your video. Animoto automatically creates four standard file sizes:
- 360p
- 480p
- 720p
- 1080p
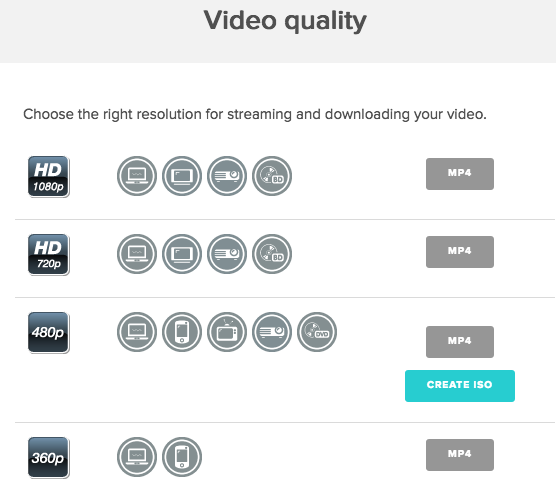
You can download the video to your computer or post the video right from the app to many different platforms, including:
- Embed
- YouTube
- Vimeo
and more!
You select which platform, and Animoto walks you through it.
The app also provides some analytics.
Congratulations, you’ve created your first Animoto video! Once you get the hang of it – which won’t take long since Animoto is a breeze – you’ll be creating videos all of the time.
Ready to see my video?
Animoto offers more options than I covered here, so be sure to check out their website for more information.
I’d love to hear what you think about Animoto and how you plan to use it in your business. Let me know in the comments!
9 thoughts on “How to Create Amazing Video For Your Business”
Thanks Amar! YES, Animoto is a wonderful tool and I hope you will try it!
Glad you found this useful, Johnathan!
I am loving it, Geniece!
Thanks for sharing information, really very useful content.
Another great, detailed how to! Thanks for the thorough information you provide and the way you respond to your commenters. (I noticed that this post was in response to a comment on the how to create a blog in 30 days post. ) Outstanding. I will be checking out animoto.
WOW, Really useful tips, I really appreciate your article, Thanks for sharing your article.
As someone who spends their waking hours convincing would-be clients to devote resources (time and money) to producing video content for their brand and their products and services, this is great information to help convert the unconvinced. Would you also agree that one of the most important components of a video is a story. That story can be simple, but without it, we find engagement always lacking. What do you think?
Thanks for the great content!
Capitola Media
Smart marketers have discovered the immense benefits of videos, especially for engagement. As more people become aware, tools have been made available to make video production quite seamless. Thanks for sharing your knowledge.
Yes, Videos ads are the best way to convince customers. Thank you for the article. Really helpful 🙂