Whether you have set up Twitter Cards or not, you have likely seen them in action on your Twitter feed. They take a plain, text-only tweet and expand it into something that stands apart from other tweets, capturing interest and increasing click-through rates.
Twitter Cards allow you to attach rich media to your tweets, so that if you – or someone else – links to a page on your site, a ‘card’ or extra block of text, images or videos are added to the tweet.
If you see a tweet that says ‘View summary’ below it, you know there’s an attached Twitter Card. For instance, take a look at the following tweet:
If you click on ‘View summary’, the tweet expands and you see a ton of additional content:
What Types of Twitter Cards are Available?
We’ll jump into how to set up Twitter Cards in a minute, but first let’s quickly run through the 9 basic types of Twitter Cards you can use:
- Summary Card – This is the default card. It includes a title, description, thumbnail image and a link to your Twitter account.
- Summary Card with large image – Same as the regular summary card, but with a bigger image and some additional info
- Photo Card – Photo only
- Gallery Card – Includes 4 images
- App Card – Allows users to directly download a mobile app
- Player Card – Shows video, audio or media
- Product Card – Shows product details (ideal for ecommerce sites!)
The last 2 cards are available only through the Twitter ads dashboard:
- Lead generation Card – Generate leads for products or services
- Website Card – Encourage visitors to click-through to your website
How to Set up Twitter Cards
The nice thing about Twitter Cards is once you have set them up for a particular page or post, you are done. After that, each time someone tweets that page, your Twitter Card gets attached. In the same way that Facebook grabs a thumbnail, title and description when you post a link, Twitter’s crawlers automatically find and attach cards to your tweets.
Setting up Twitter Cards will involve adding a few lines of code to your site, and then validating it; if the idea of jumping into your code terrifies, you will want to stick with the first option below!
The Easy Option: Using a WordPress Plugin
If you have a WordPress site, you’re in luck! Chances are you already have the Yoast SEO plugin installed. If so, follow the instructions below.
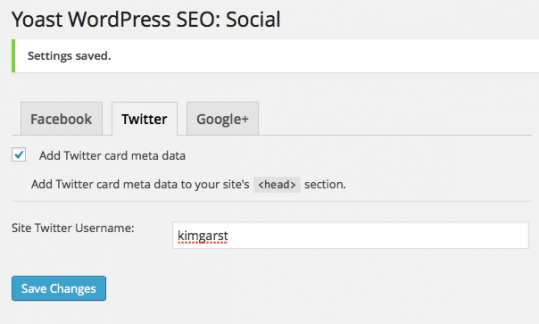
1. In your WordPress dashboard, go to the Yoast plugin, and then the ‘Social’ page. Make sure ‘Add Twitter meta data’ is checked, input your Twitter username and click ‘Save Changes’.
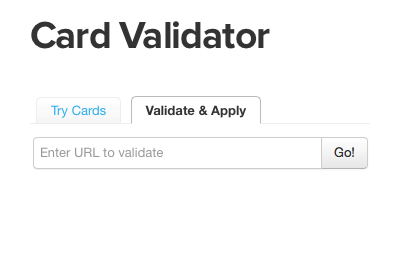
2. Next go to Twitter’s Card Validator to have the card approved for your site. Click on the ‘Validate & Apply’ tab, and enter the URL of your page. Hit ‘Go’ and wait to be approved! (shouldn’t take long).

The Less-Easy Option (But Still Easy)
Setting up Twitter Cards manually does require a bit of coding know-how. This may be a good task to hand over to your tech-person if you’re leery of jumping into the code!
- Choose the type of card you’d like for your page (see the list above for the 9 types of cards Twitter currently offers).
- Go here and click on the link to the type of card you’d like to use (under ‘Cards that drive engagement from your Tweets’).
- Grab the code from the bottom of the page, and paste it into the <head> section of your page. Customize info as necessary.
- Run the URL through Twitter’s Card Validator tool.
- Tweet a link to that URL to ensure the card is working.
For detailed instructions for how to manually set up each type of card, check out this post on Forbes: The Definitive Guide to Using Twitter Cards.
Why Should I Use Twitter Cards?
There really is no downside to using Twitter Cards. It may take you a few minutes to set up, but the benefits far outweigh the minimal time investment.
One of the biggest (and most obvious) benefits is the increased real estate you get on your followers’ feeds.
Cards allow you to add far more content to your title and description, as well as bigger images. This means more exposure, more space to get your message across, and increased clicks to your site.
Twitter Cards also ensure you get proper attribution for your content. Because each card includes attribution to your Twitter account, you’re guaranteed to get credit for your content. Plus, if you specify your info in twitter:site and twitter:creator, you get credit TWICE when your content is tweeted: once as the author of the content, and once as the publisher.
Have you set up Twitter Cards for your site yet? If you haven’t, what’s holding you back?
About Author
Kim Garst
Kim Garst is a renowned marketing strategist and speaker who is trailblazing the use of artificial intelligence in digital marketing. With over 30 years of experience as an online entrepreneur, Kim helps entrepreneurs grow their business and authority online by using AI technology. She is leading the way with proven AI frameworks that help entrepreneurs build authority in their space.
She is keynote speaker and an international best-selling author of Will The Real You Please Stand Up, Show Up, Be Authentic and Prosper in Social Media.
Named by Forbes as a Top 10 Social Media Power Influencer, Kim is well-known for her skill to simplify complex technology and make the use of AI understandable for business growth. Her relatable, actionable advice helps guide new entrepreneurs to harness the power of AI to succeed in digital marketing. Kim is leading the way in combining human and technological skills to create a new model for AI-powered marketing.


7 thoughts on “How To Set Up Twitter Cards and Why You Should Do So”
WOW, thanks for the info, Konrad!
Thanks Paula 🙂
We love you, Kim. Keep up the good work.
I retweeted it
Thanks for the information. I will be implementing this on my blog ASAP
Thanks for the info. Please update the links…
great Info.this the first time to know about twitter card.