When you watch Facebook Live videos, do you do so with the sound on?
If you’re like 85% of users, you probably don’t.
This means that for your OWN videos, giving viewers a way to quickly and easily understand the content of your live video – even when it’s muted – is key.
The best way to do this is through adding subtitles and captions to your Facebook Live videos.
Why Use Captions On Your Facebook Lives?
With so many videos vying for attention in users’ feeds, it’s important to make your videos as captivating as possible.
Not only do captions and subtitles attract viewers to your videos in the first place, they can actually increase how long your videos get watched for; according to Facebook’s own internal research, videos with captions are viewed an average of 12% longer than those without.
According to Rye Clifton, director of experience at ad agency GSD&M, making videos as interesting as possible – even with the sound off – is key: “Sound is still an option [on Facebook], but it’s not required. If you can make something compelling without needing people to turn the audio on, you’re ahead of people who are not thinking that way.”
3 Ways To Add Captions To Your Facebook Lives
Unfortunately, adding captions to your Facebook Live videos hasn’t always been as easy or as straightforward as you might hope. If you do a Google search for “Facebook Live captions tutorial”, you’ll find a wide variety of strategies, but many involve using complicated – and sometimes pricey – third party software.
You’ll also find there isn’t yet a way to add captions to your live videos as they happen – which means that at this point, you can only add them to replays of your videos.
Fortunately, it’s relatively easy to add captions to your videos after the fact…meaning you can continue to use and promote your videos for many months to come.
This post will take the guesswork out of the process. Using the simple tools and strategies below, you’ll be up and running in no time, with little technical know-how required!
1. Have your Facebook Live Transcribed Using Rev.com
Rev.com is the service I use to get highly-accurate captions for my Live videos at an amazing price. For just $1 per recorded minute, Rev.com will convert the audio of your video into captions. So, for a 30-minute video, you’re looking at just $30!
Here’s how it works: First, send them a copy of your Facebook Live video. Alternatively, you can just send them a link to your video, and they’ll grab it directly.
Next, the Rev team quickly and confidentially captions the video. Turnaround time can be as little as 30 minutes for really short videos, up to 24 hours for longer ones.
Finally, Rev will send you the completed captions file in .SRT format – which is the format Facebook requires.
The final captions file will look something like this:
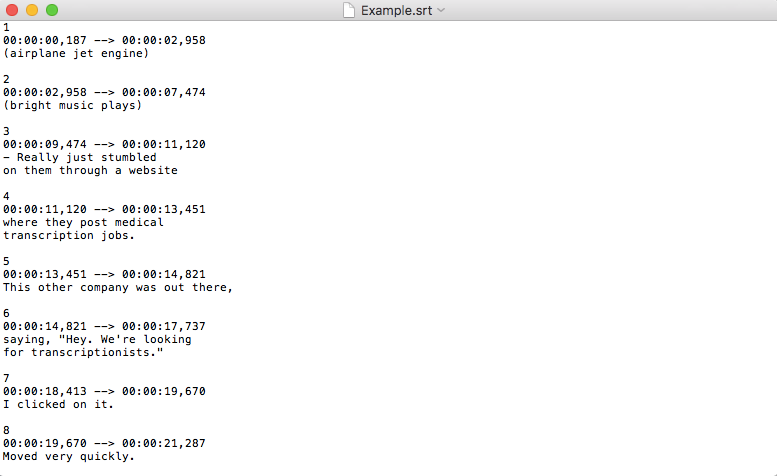
Your .SRT file will note time frames and the text that falls into each one
Now you just need to upload this .SRT file to Facebook and you’re good to go! To upload your caption file, follow these simple steps:
- Go to your Facebook page, and select the Facebook Live video you want to add captions to
- Click on the time stamp to open the video in theatre mode
- Under “Options”, click “Edit this video”
- Under “Captions” (below “Description”), select “Choose File”
- Upload your .SRT file and you’re good to go!
Now, when someone views your video, the captions will automatically show.

2. Create your own .SRT file and upload to Facebook
This is the slightly more complicated and time-consuming option….but it’s completely FREE!
The process is the same as above, except you’ll need to create your own .SRT file instead of getting a third party company to do it.
Here’s how you’ll do it: Using a text editor (like TextEdit on Mac or Notepad on Windows), open a new document.
The format of your document will look like this:
# of caption (starting at 1, going as high as you’d like)
Start time of segment you’d like to caption à End time of segment you’d like to caption
- Actual caption
The actual text will look something like this:
1
00:00:00,000 –> 00:5:30,000
– Welcome to my Facebook Live
2
00:5:30,000 –> 00:7:55,000
– 5 Ways To Get More Customers
3
00:7:55,000 –> 00:9:30,000
– Wrapping it up
Once you’ve finished creating your file, simply save it as a .TXT file. If you’ve correctly formatted your file, it should recognize that you created a captions file and will automatically save it as a .SRT file.
Finally, upload your file to your Facebook Live video using the instructions above!
Need more detailed instructions (including screenshots) for creating and uploading your .SRT file? Check out this great tutorial!
3. Use YouTube’s Video Manager
Apart from using a transcription service like Rev.com, this is the perhaps the easiest way to create your subtitles. You’ll need to actually transcribe the video yourself, but the process is a lot easier than creating your own .SRT file from scratch.
Here’s how it works: Upload your Facebook Live video to your YouTube account. Be sure to set the video to “Private” since you won’t actually be publishing it to YouTube.
Next, click on Edit, then Subtitles/CC.

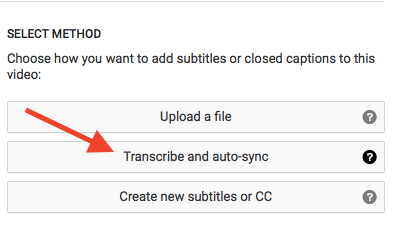
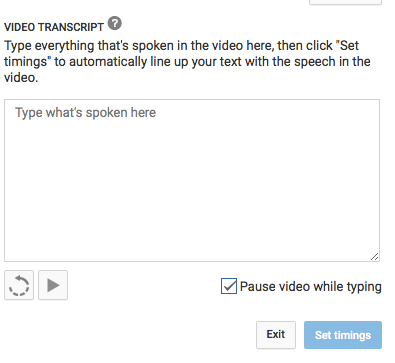
You’ll now have three options: Upload a file, transcribe and auto-sync, or create new subtitles or CC. Select Transcribe and auto-sync. This will allow you to simply transcribe your entire video at once, and then YouTube will automatically line up your captions for you!
As you watch the video, you can now type in exactly what you hear. Be sure to select Pause video while typing, as this will seriously cut down on the time it takes you to transcribe your video.
When you’re done, simply click Set Timings and your video captions are done!
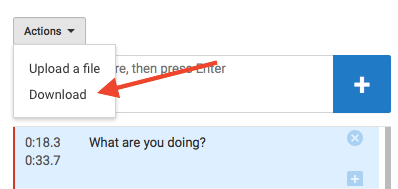
Keep in mind you’ll likely need to edit the timing and captions slightly, so be sure to watch the video with captions before downloading it. To do this, simply click on the video under Drafts and adjust the timing as needed.
Once you’re satisfied with your video, click Download under Actions and your .SRT file will automatically download.
You can now upload your .SRT file to Facebook as outlined above.
Final Thoughts
I look forward to the time when Facebook (hopefully) puts a system in place for automatically adding captions to our Facebook Lives. But until then, the three strategies above are relatively simple and inexpensive, meaning anyone can add captions to their videos in no time at all.
Looking to start doing Facebook Lives? Check Out this post:
How to Look Like a Pro Using Facebook Live: Lights, Camera, Action
How do you create captions or subtitles for your Facebook Lives? Let us know in the comments below!

6 thoughts on “How to Quickly and Easily Add Captions To Your Facebook LIVE Videos”
I agree wholeheartledly, Joanna.
Does facebook use An auto-diction program for subtitles? I was just watching a program in which the subtitles do not even convey the correct message.
This shows a lack of care towards people that may depend on subtitles. Zuckerberg should really improve this feature. It is really bad.
wonderful issues altogether, you simply won a emblem new reader.
What may you suggest in regards to your put up that you simply made a few days ago?
Any positive?
Hello I am so excited I found your webpage, I really found you by accident, while I was browsing on Digg for something else,
Anyways I am here now and would just like to
say thank you for a marvelous post and a all round enjoyable blog (I also
love the theme/design), I don’t have time to read through it all at the minute but I have saved it
and also added in your RSS feeds, so when I have time I will
be back to read a great deal more, Please do keep up the awesome work.
How can one add bible scriptures during the live session ?
Hi Don, you can do that by creating Bible verses graphics as ‘overlays’. You can show them once it’s time for you to do so when you’re using a live streaming tool like StreamYard. (kimgarst.com/streamyard)
I did a LIVE training on Facebook about How to Create a Virtual Studio “Look” for your LIVE Streams Watch it so you’d be guided.
This will definitely help.