Thank you for subscribing to Kim Garst!
We take great pride in delivering fresh, timely social media content without the hype and want to make sure that our emails are making it to your inbox on a consistent basis. Most e-mail providers have filters that try to keep the e-mails you do not want to receive from getting into your inbox, instead routing them to a “spam” folder. The problem is that sometimes the e-mails you DO want to receive get sent there too. By doing something called “whitelisting”, you are telling these providers to make sure you send all of the Kim Garst e-mails to your inbox, not your spam folder.
To Ensure You Are Receiving Your Kim Garst Emails, We Suggest You Do The Following:
Be sure to add the Kim Garst email address (hello@kimgarst.com) to your email whitelist to ensure the best chance of receiving our content and updates
How to Whitelist Kim Garst:
Of course, every e-mail system is different. Below are instructions for some of the more popular ones. If yours isn’t here, please contact your ISP’s customer service folks for their instructions. (Forward the answer to us, and we might add it!) If you’re using some sort of spam filtering or blocking software yourself (in addition to what your ISP provides), we’ve also listed instructions on how to exempt your subscription from some of the more popular of those programs.
Gmail:
1. In your inbox, locate an email from hello@kimgarst.com (ex. your welcome mail for the product you just purchased or your subscription welcome e-mail from Kim).
2. Drag this email to the “primary” tab of your inbox.
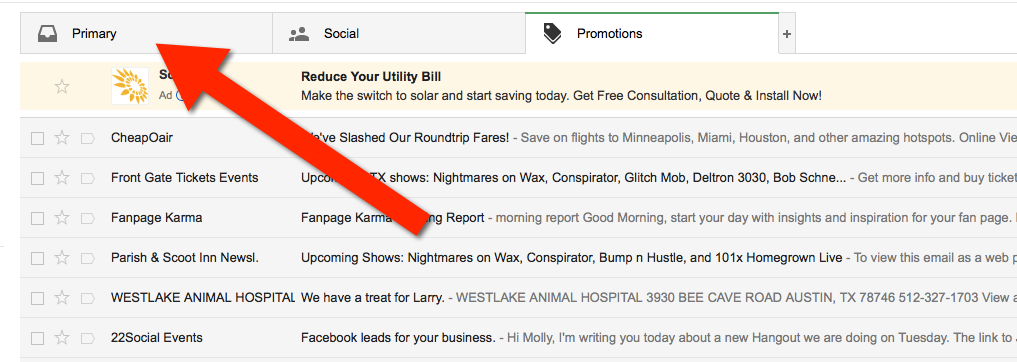
3. It will ask you to confirm that you want future emails from hello@kimgarst.com to go straight to your Primary Tab, tick Yes. You’ll see that our emails will go to your primary folder in the future!
Yahoo! Mail
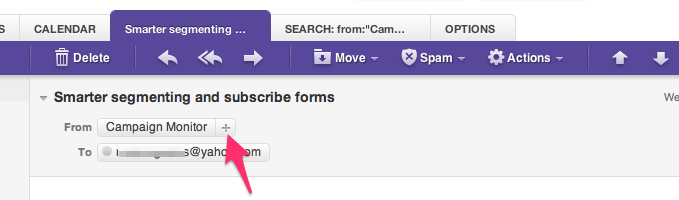
When opening an email message, a “+” symbol should display next to From: and the sender’s name. Select this and an “Add to contacts” pop-up should appear. Select “Save”:
Mac Mail
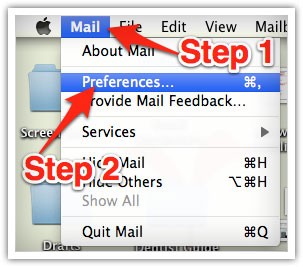
Select “Mail” and “Preferences” from the top menu.
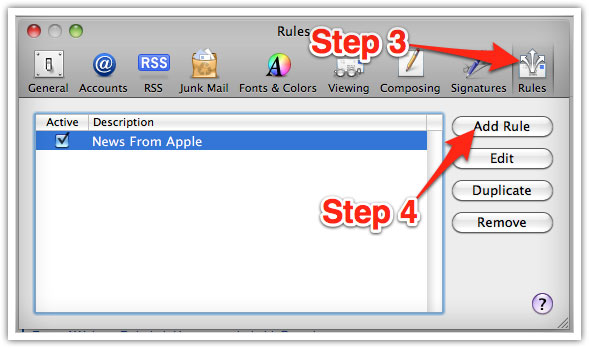
In the “Preferences” window, click the “Rules” icon.
Click the “Add Rule” button.
In the “Rules” window, type a name for your rule in the “Description” field.
Use the following settings: “If any of the following conditions are met: From Contains.”
Type the sender’s email address in the text field beside “Contains.”
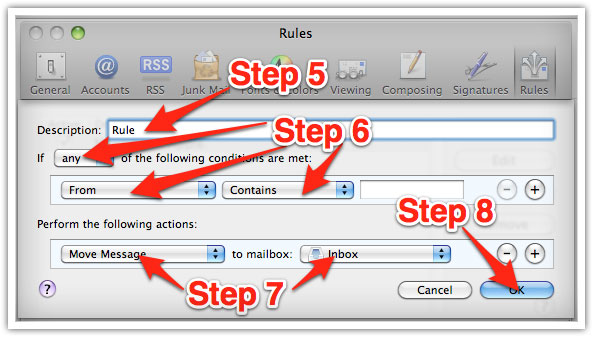
Select “Move Message” and “Inbox” from the drop-down menus.Click “Ok” to save the rule.
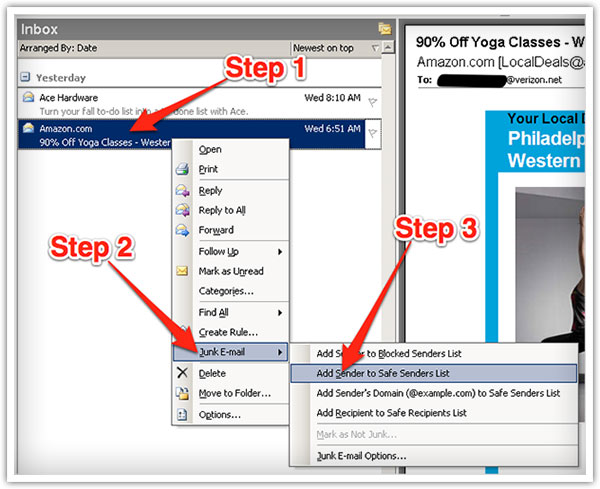
Outlook 2003 & Later
Right-click on the message in your inbox.
Select “Junk E-mail” from the menu.
Click “Add Sender to Safe Senders List.”
That is about it! If you have any further questions about whitelisting, please contact us at hello@kimgarst.com.